Three age ranges. Each lesson is suitable in any centre with the specific age group. Keep in mind, these lesson plans can be changed to suit other age groups too.
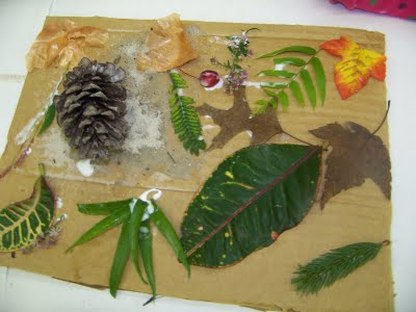
0-2 Year Olds Nature Collage
**Best Suited for 12 months to 2 year olds.**
Learning Outcomes Achieved (EYLF)
OUTCOME 1: CHILDREN HAVE A STRONG SENSE OF IDENTITY
Children develop their emerging autonomy, inter-dependence, resilience and sense of agency - Persist when faced with challenges and when first attempts are not successful
OUTCOME 2: CHILDREN ARE CONNECTED WITH AND CONTRIBUTE TO THEIR WORLD
Children become socially responsible and show respect for the environment - Demonstrate an increasing knowledge of, and respect for natural and constructed environments.
Duration
Estimated:
15 Minutes Collecting Resources
30 Creating
**Note** The time can vary depending on how long you
wish to be outside, and how interested in the task the children
are.
Size of Group
About 4 children per group. The smaller the group, the better.
Lesson Resources
* Collection of leaves, sticks, sand, dirt, anything the children can find. (The items need to be dead, or recently dead. Don't pull things off plants)
* Some sort of a surface - contact paper, construction paper, card, wood, paper bag (today we are using the paper bag)
* Craft glue
* Brushes to spread the glue (optional)
* Newspaper (for the mess)
* Contact Paper (optional)
Background to Learning
Children will learn about sustainability, art & nature. Other things, such as maths can be included if you count with children the things they have on their collage.
Content of Lesson
On a calm day, take a small group of children out side with their paper bags. Have the children look around and start collecting natural items and placing them in their bags. Have the children observe their environment and point something out to they haven't seen before. Have conversations with the children about not disturbing the bug life, but letting them know that they can still look. Talk to about, if they find a bug under a rock or something, to put the item back, as this is their home.
Instructions
Done on a table with the same small group of children, in whatever period of time you wish. No less than 15 minutes though. DO NOT RUSH THE CHILDREN !!
1. Have the children empty the contents of their paper bags on the table. If you are concerned about mess, you can place some newspaper down. Have the children share what they found. Allow them to feel the textures and weight of the items. Have them smell all the pieces. If you have shells, or items with holes in them, you can get the children to listen to what's inside too.
2. With the same paper bags, or if they are damaged give new ones, have the children glue down the pieces of nature onto their bags. Listen to the conversations going on, if any, and if relevant, join in.
3. When finished, you can count with children the amount of leaves, or naturals items they have on their bags. At the end you can ask what the child did, what they made. Remember: Don't tell them what they have made, let them decide for
themselves.
If you want, you can cover the bags in contact to seal them items in place. Make sure you get the child's permission first.
At the end, the children will have their own little treasure bags made out of their own treasures.
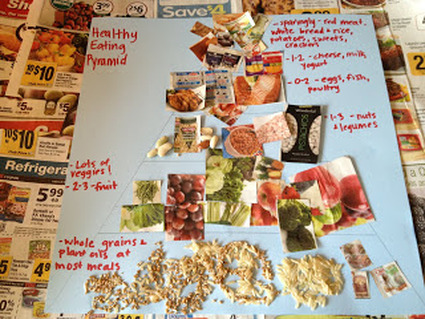
3 to 5 Year Olds Food Pyramid Collage
Learning Outcomes Achieved (EYLF)
OUTCOME 1: CHILDREN HAVE A STRONG SENSE OF IDENTITY
Children develop their emerging autonomy, inter-dependence, resilience and sense of agency - Be open to new challenges and discoveries.
OUTCOME 3: CHILDREN HAVE A STRONG SENSE OF WELLBEING
Children take increasing responsibility for their own health and physical wellbeing - Recognise and communicate their bodily needs (for example, thirst, hunger, rest, comfort, physical activity)
Duration Estimated:
Over a week period to get a collection of food, then an hour to put together the pyramid with the children
**Note** The time can vary depending on how interested in the task the children are.
Size of Group
About 4-5 children per group. The smaller the group, the better.
Lesson Resources
* Colour Card
* Colour Paper
* Crayons
* Scissors * Glue
* Large card to create a food pyramid
Background to Learning
Children will learn to: review and learn about shapes, they will improve their cutting and gluing skills.
They learn about collage by creating their own food collage using overlapping of shapes
Content of Lesson
The idea of this lesson is to teach children about healthy eating. You will be creating a collage food pyramid with the children. The children will make their own collage food and then put it in a class pyramid.
Instructions
Done on a table with all the equipment spread out so that the children can make their own food. The only instructions the children should be given is make your own piece of food. Don't tell them what to make or how to make it. You are only there to assist them if they ask.
1. Ask the child what food they will make and ask them about the colours that are in that food.
2. Have them cut out the shape of the food.
3. Get the children to cut out small pieces of the colour of the food and get them to stick it onto the cut out shape. This way they are create depth and texture with their collage, even if it is the same colour.
4. Once all the food is made and dried, gather the children around, small groups each time, and have them stick their food in the space it belongs in the food pyramid
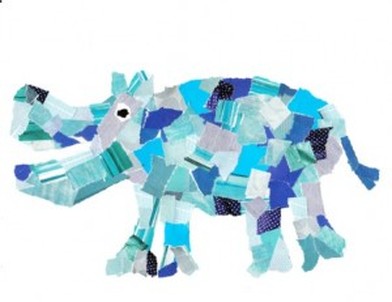
6 to 8 Year Olds - Matisse Collage Inspiration
Learning Outcomes Achieved (AusVELS)
Creating and making is one part of the AusVELS Curriculum. It focuses on the ideas, skills, techniques, processes, performances and presentations. These include engagement in concepts, the way students explore the ideas, experiences and feelings. Students will work on their planning skills, application of arts elements and the principles and conventions of art. (VCAA, 2013)
Duration Estimated:
2 hours - 1 hour to paint and allow the sheet to dry
- 1 hour to create the collage
Size of Group
Works with about 10 children if the
room permits it.
Lesson Resources
* Blank White A4 Sheets of Paper
* Variety of Dye Paint
* Paint Brushes
* Grey Lead Pencils
* PVA Glue
Background to Learning
Children will learn about collage, about how colour works and blends together. Children will work on their instruction and listening skills.
Instructions
1. Give the children a sheet of paper and allow the to choose a coloured dye.
2. Tell the children to paint the whole sheet with dye. When they paint the sheet tell them to create three shades with the one
colour and get them to add a bit of texture too.
3. Set the sheets aside to dry.
4. Have the children draw an animal multiple times, practicing their drawing skills, whilst waiting for their paper to dry.
5. Have the children draw their animal bigger on a sheet of paper.
6. Once the coloured paper is dry, give them the instructions to cut, or rip their paper into small pieces, then tell them to glue these pieces on their drawing, creating a colour animal collage.
Don't tell them how to glue it down, or give them any assistance in their art. It is their art work, not yours.
Assessment
Have children share their collages with other people in the class. Have the children assess each others work. (Ensure they are not best friends as the results will be biased).
For the Teacher:
* Assess the way the children listen and follow instructions.
* Take notes on what the child is doing and how they are doing it.
* Have a discussion with the student about how they created their work, and get their feedback on it.
(Ideas from Boughton, 1994)
**Remember**: It is about the process of the task, not about the product.
| 0-2_year_olds.pdf |
| 3-5_years.pdf |
| 6_-_8_years.pdf |
